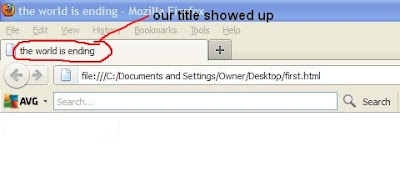
Like i mentioned earlier, in creating a HTML document or a web page, we use tags, for instance the opening tag of any HTML document is <html> and this marks the beginning of a HTML document.
To indicate the end of a HTML document, the closing tag </html> is used. Notice the different between the two tags - the closing tag is just the opening tag with a forward slash before the element in the tag. We wont be needing any fancy web designing application, bust just the trusty old notepad because this is about the basics. Now open your notepad in your PC and laptops and let's begin proper.
Firstly, in your notepad, type:
<html>
</html>
This will tell the browser where the html document starts and where it ends. Then within the HTML start and end tags, add the Head tag . The head tag contains information about the page like the title of the page which appears just at the top of the browser window, the metadata (used by search engines to index web pages) and link to style sheets and codes(like, javascript, php, etc) but for now, what we'll only include in the head tag is the title of the page. After the insertion of the head tag, your notepad should look something like this:
<html>
<head>
</head>
</html>
Next we add a title to our page with the Title tag which displays the title of the page a the top of the browser.
<html>
<head>
<title></title>
</head>
</html>
To add contents to a tag, we insert the contents between the opening and the closing tags as you should have known by now. So to add the textual description our page, we type it between the Title tag. Let's say the name of our web page is "the world is ending" or whatever your page is all about. Then type it in the Title tag as below.
<html>
<head>
<title>the world is ending</title>
</head>
</html>
Lets see how our work looks but before that, we have to save the document.
- In your notepad, click on the file menu and then on "save as" option from the drop down menu.
- On the dialogue box that appears, create a new folder and name it whatever you like.
- In the "file name" type in first.html,
- On the "save as type" select "all files(*)" and leave the "encoding" set to "ANSI" by default.
- Then click on save.


No comments:
Post a Comment